Savor the Flavor – Try Our Best Recipes Today!

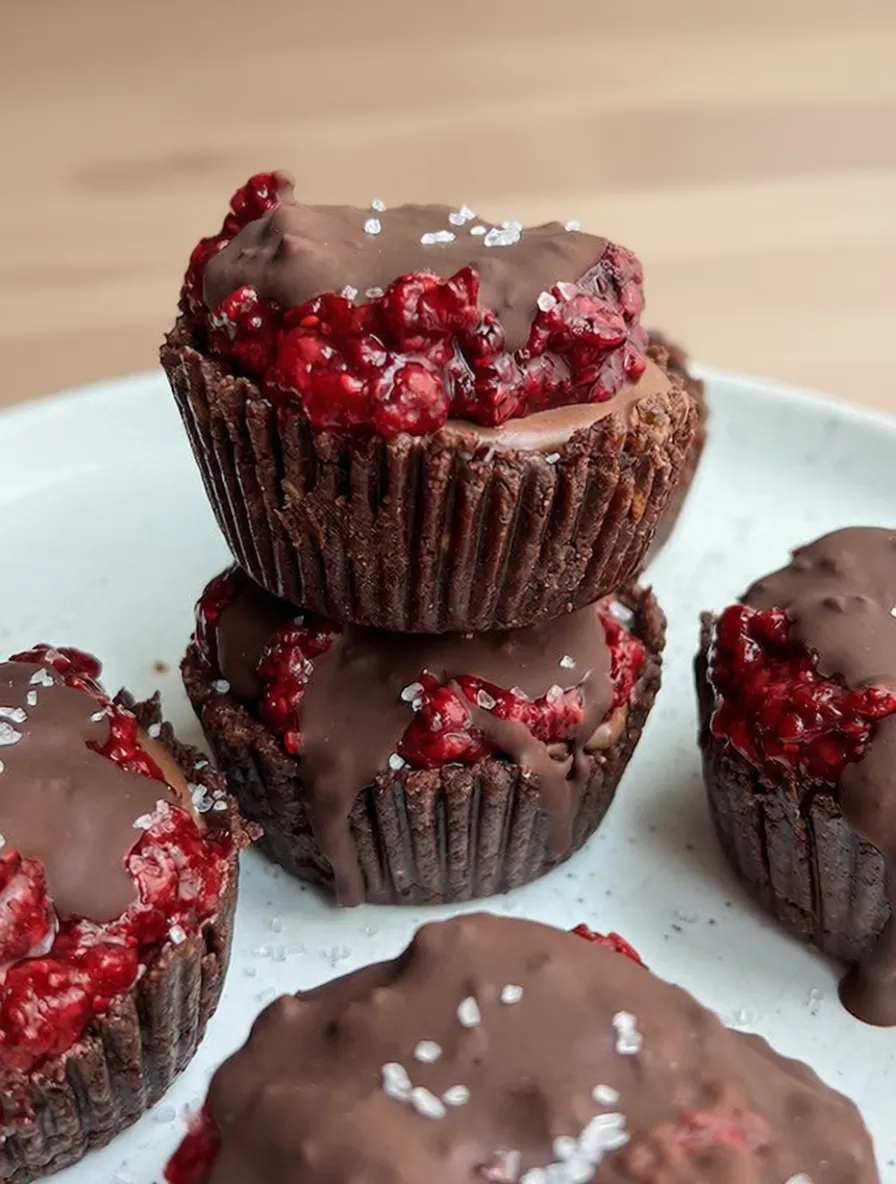
No Bake Raspberry Chocolate Mousse Cups
If you’re dreaming of a dessert that’s as beautiful as it is decadent — without ever turning on your oven — these No Bake Raspberry Chocolate Mousse Cups are exactly what you need. They’re creamy, rich, and filled with the perfect balance of sweet chocolate and tangy raspberries, layered into individual cups that look stunning on any table.
This dessert feels like something you’d order at a fancy restaurant, yet it’s incredibly easy to make at home. Whether you’re hosting a dinner party, surprising someone special, or simply treating yourself, these mousse cups are a guaranteed showstopper.
🍓 Why You’ll Love This Recipe
✨ No baking required — perfect for warm days or busy kitchens.
🍫 Velvety chocolate texture — rich, airy, and melt-in-your-mouth smooth.
🍇 Beautiful presentation — elegant enough for guests, easy enough for everyday indulgence.
💖 Perfect flavor combo — dark chocolate and tart raspberries create a delicious harmony.
🕒 Make-ahead friendly — prepare them hours in advance and chill until ready to serve.
🧁 Ingredients You’ll Need
This dessert uses simple, high-quality ingredients to create a flavor that feels luxurious and comforting at the same time.
For the Chocolate Mousse Layer:
- 1 cup heavy whipping cream
- 6 oz semi-sweet or dark chocolate, finely chopped
- 2 tablespoons unsalted butter
- 2 tablespoons sugar
- 1 teaspoon vanilla extract
- A pinch of salt
For the Raspberry Layer:
- 1 cup fresh or frozen raspberries
- 1 tablespoon lemon juice
- 1 tablespoon sugar
- 1 teaspoon cornstarch (optional, for thicker sauce)
For the Whipped Cream Topping:
- ½ cup heavy whipping cream
- 1 tablespoon powdered sugar
- ½ teaspoon vanilla extract
Optional garnishes:
- Fresh raspberries
- Shaved chocolate or cocoa powder
- Mint leaves for a pop of color
👩🍳 How to Make No Bake Raspberry Chocolate Mousse Cups
Step 1: Make the Raspberry Layer
In a small saucepan, combine raspberries, lemon juice, and sugar over medium heat. Cook for about 5–6 minutes, stirring occasionally until the raspberries break down and release their juices.
For a thicker sauce, stir in the cornstarch mixed with a teaspoon of water and cook for another minute until it slightly thickens.
Remove from heat and allow it to cool completely. This bright, tangy raspberry layer adds a burst of freshness that cuts through the rich chocolate mousse.
Step 2: Prepare the Chocolate Mousse
Place the chopped chocolate, butter, and sugar in a heatproof bowl. In a small saucepan, warm ½ cup of the heavy cream until just about to boil, then pour it over the chocolate mixture. Let it sit for 1 minute, then whisk until smooth and glossy.
Stir in the vanilla extract and a pinch of salt. Allow the chocolate mixture to cool to room temperature.
Meanwhile, whip the remaining ½ cup of cream to soft peaks. Once the chocolate has cooled, gently fold in the whipped cream until no streaks remain. This creates a light, airy mousse texture that’s simply irresistible.
Step 3: Assemble the Dessert Cups
Now comes the fun part — layering!
In small glasses, jars, or dessert cups, spoon about 1–2 tablespoons of the raspberry sauce into the bottom.
Top with a generous layer of chocolate mousse, spreading it evenly with the back of a spoon or piping bag for a clean look.
Chill the cups in the refrigerator for at least 1 hour, or up to overnight. This allows the layers to set and the flavors to meld beautifully.
Step 4: Add the Finishing Touches
Just before serving, whip together heavy cream, powdered sugar, and vanilla extract until fluffy.
Pipe or spoon the whipped cream over the chilled mousse, then garnish with fresh raspberries, shaved chocolate, and a sprig of mint if you’d like.
The final presentation is pure elegance — creamy layers of chocolate and fruit topped with clouds of whipped cream.
🍇 Tips for Perfect Results
- Use good-quality chocolate: It’s the star of the show, so pick one you love to eat.
- Cool the chocolate before folding: Warm chocolate will melt your whipped cream and ruin the mousse texture.
- Chill thoroughly: The longer it sets, the silkier it gets — overnight is ideal.
- Serve cold: These cups taste best chilled straight from the fridge.
🎀 Make-Ahead & Storage
These mousse cups are perfect for prepping ahead!
- Make-ahead: You can prepare them up to 24 hours in advance and store covered in the fridge.
- Storage: Keep refrigerated for up to 3 days.
- Freezing: You can freeze the mousse layer for up to 1 month, though fresh raspberries and whipped cream should be added after thawing.
🍫 Variations to Try
There’s endless room to play with flavors here!
- 🍓 Strawberry Mousse Cups: Replace raspberries with strawberries for a classic twist.
- 🍒 Black Forest Style: Add a layer of cherry compote and sprinkle with chocolate shavings.
- ☕ Mocha Mousse Cups: Add 1 teaspoon instant espresso powder to the chocolate mixture.
- 🥥 Coconut Chocolate Cups: Layer toasted coconut flakes between the mousse and fruit.
Each variation adds a fun, personalized touch to this no-bake dessert.
🌟 Why This Recipe Works
This recipe delivers restaurant-quality flavor with home-kitchen simplicity. The no-bake method keeps it light and fuss-free, while the raspberry layer balances the richness of the chocolate. The individual cups make serving easy — no slicing, no mess, just pure dessert bliss.
Plus, it’s visually stunning. The contrast of deep chocolate and bright berries creates a picture-perfect dessert that’s made for sharing… and for Pinterest-worthy photos! 📸
❤️ Final Thoughts
These No Bake Raspberry Chocolate Mousse Cups are proof that you don’t need complicated techniques or baking skills to make a dessert that feels utterly luxurious. Every spoonful delivers a silky-smooth chocolate mousse, a burst of tangy raspberry, and a creamy finish — an elegant balance that keeps you coming back for more.
Serve them at your next dinner party, holiday gathering, or romantic evening at home. One bite, and everyone will think you spent hours in the kitchen — only you’ll know it took less than 30 minutes.
Because sometimes, the best desserts are the simplest ones.