Savor the Flavor – Try Our Best Recipes Today!

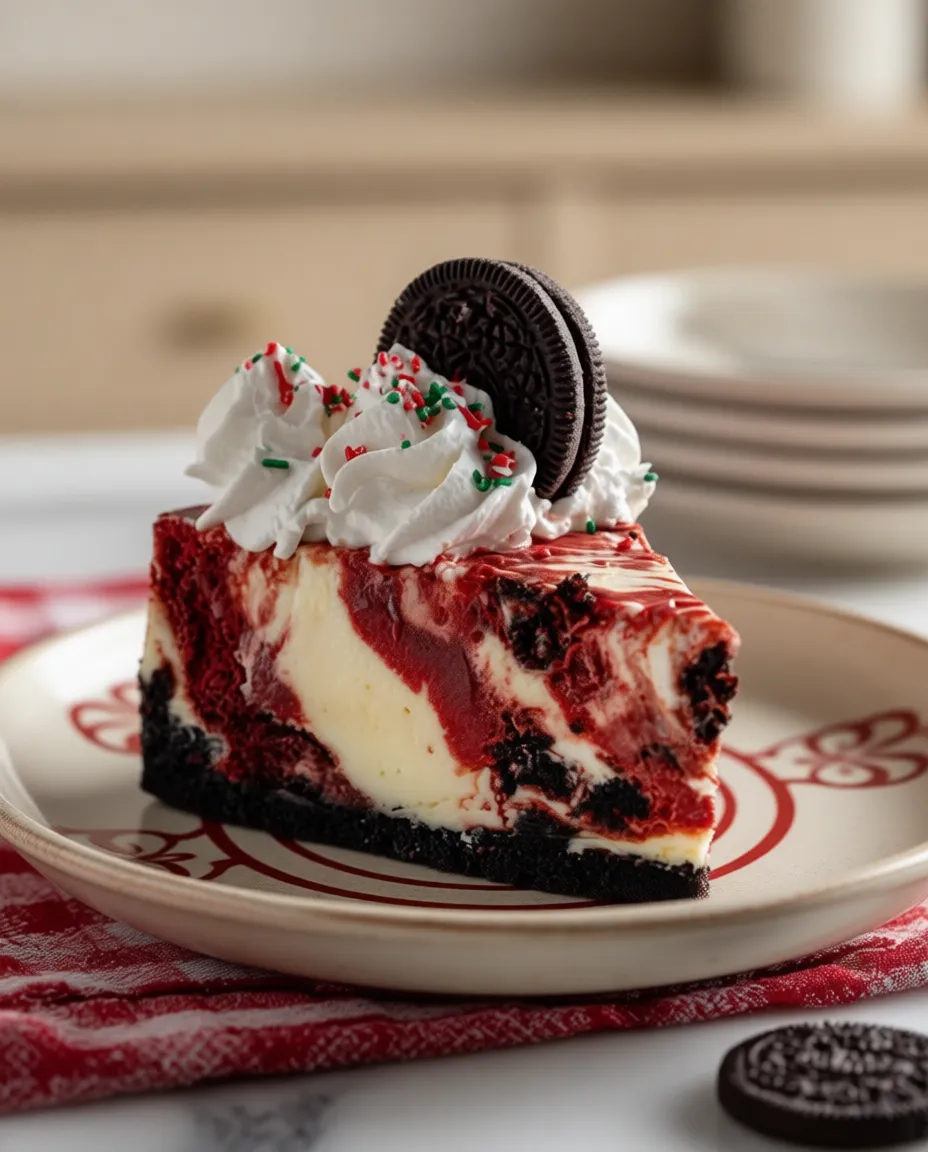
Christmas Red Velvet Cheesecake with Oreo Crust
There are holiday desserts… and then there is the holiday dessert—the one that makes people stop mid-conversation, lean in, and whisper, “Who made this?” This Christmas Red Velvet Cheesecake with Oreo Crust is that dessert. Creamy, velvety, dramatic, and unapologetically festive, it captures everything we crave during the holidays: comfort, indulgence, nostalgia, and just a bit of magic.
If you’ve ever wished for a dessert that tastes like a warm hug wrapped in holiday sparkle, this is it. An Oreo cookie crust gives you that perfect chocolate crunch, while the red velvet cheesecake filling bakes into a lusciously smooth, tangy, cocoa-kissed dream. Topped with whipped cream, white chocolate curls, or even crushed candy canes, it’s the kind of dessert that delivers the “wow” factor with almost embarrassingly little effort.
This recipe is surprisingly straightforward—no water bath, no complicated steps, and no special equipment beyond a mixer and a springform pan. But the results? Fancy-bakery level. Christmas-party-showstopper level. Instagram-exploding level. Let’s bake something unforgettable.
WHAT MAKES THIS RECIPE GREAT
- Foolproof texture: Creamy and silky without fussing with water baths or complicated temperature control.
- Holiday showstopper: The deep red color against the dark Oreo crust creates a festive, dramatic presentation.
- Beginner-friendly: Straightforward steps, minimal equipment, and simple ingredients.
- Customizable toppings: Dress it up with whipped cream, ganache, berries, or crushed peppermint for any holiday style.
- Make-ahead magic: Cheesecake tastes better the next day, making this ideal for busy holiday prep.
INGREDIENT BREAKDOWN (DETAILED)
Oreo Crust
- Oreo cookies (no filling removed!)
The creamy center melts during baking, helping bind the crust. Sub with chocolate graham crumbs if needed. - Unsalted butter
Butter provides richness and keeps the crust crisp when chilled. Salted butter works—just omit added salt elsewhere.
Red Velvet Cheesecake Filling
- Cream cheese
The star ingredient. Use full-fat blocks—never spreadable cream cheese—which contains too much air and stabilizers. - Granulated sugar
Sweetens the cheesecake and helps create that smooth, whipped texture. - Sour cream
Adds tang and silkiness. Substitute with full-fat Greek yogurt if desired. - Eggs
Bind the filling and help it set. Bring them to room temperature to avoid a lumpy batter. - Cocoa powder
Classic red velvet flavor: subtle chocolate warmth. Either natural or Dutch-process works. - Red food coloring
Gel coloring produces the deepest, Christmas-red shade. Use as much or as little as you prefer. - Vanilla extract
Rounds out flavor and enhances the cocoa notes. - White vinegar
Just a splash—traditional to red velvet and helps deepen the color. - Pinch of salt
Balances sweetness and brightens the tang.
STEP-BY-STEP INSTRUCTIONS (STORY STYLE)
Grab your apron—it’s cheesecake time.
1. Build the Oreo crust
Start by pulsing your Oreos until they resemble fine, sandy crumbs. Drizzle in melted butter, stirring until everything looks like damp soil (in the best, chocolaty way). Press the mixture firmly into a springform pan. Use the bottom of a glass for crisp edges. A 10-minute bake sets it beautifully.
Chef tip: Press the crust slightly up the sides to create a cradled edge for your filling.
2. Whip the cheesecake base
In a large bowl, beat the cream cheese until it’s completely smooth—no shortcuts here! Add sugar and beat again until fluffy. Blend in sour cream, vanilla, cocoa, and vinegar. The batter should be glossy and smooth.
Avoid this mistake: Don’t rush scraping down the bowl. Unmixed lumps create clumps in the final cheesecake.
3. Add the eggs gently
Beat in eggs one at a time, mixing on low to avoid incorporating air. You’re not making a mousse—you want dense creaminess.
4. Add that iconic Christmas red color
Start with 1–2 teaspoons of gel coloring, adjusting until your batter is a deep, festive red.
5. Bake low and slow
Pour the filling onto your crust and tap the pan gently to release bubbles. Bake at 325°F (163°C) until the edges are set but the center still jiggles—usually around 55–65 minutes.
Don’t overbake: The wiggle is good. It firms up as it cools.
6. Cool to perfection
Turn off the oven, crack the door open, and let the cheesecake cool gradually to prevent cracks. Chill for at least 6 hours (overnight is gold).
PRO TIPS
- Always soften your cream cheese completely—cold cheese = lumpy batter.
- Mix on low once eggs are added to prevent air bubbles and cracks.
- Bake on the middle rack for even heat distribution.
- If cracks form, hide them with whipped cream—your secret is safe!
- For extra chocolate flavor, add 1 tablespoon of melted white chocolate to the batter.
- For sharper edges, dip your knife in hot water before slicing.
- Let the cheesecake rest a full day for the deepest flavor.
- Freeze slices individually for effortless future desserts.
- Don’t skip the vinegar—it enhances the red color and classic red velvet tang.
- Top with white chocolate curls for an instant bakery finish.
VARIATIONS & CUSTOMIZATION
- Peppermint Twist: Add ½ teaspoon peppermint extract and top with crushed candy canes.
- Gluten-Free: Use gluten-free chocolate sandwich cookies for the crust.
- Chocolate Drizzle: Top with warm chocolate ganache for extra decadence.
- Lightened-Up: Use Greek yogurt in place of sour cream and reduce sugar by ¼ cup.
- Berry Christmas: Add a swirl of raspberry jam before baking for contrast and tartness.
Serving Suggestions
- Add a dollop of whipped cream and white chocolate curls
- Serve with hot cocoa, mulled wine, or rich espresso
- Pair with fresh berries for a refreshing contrast
STORAGE & REHEATING
- Refrigerator: Store tightly wrapped for up to 5 days.
- Freezer: Wrap slices in plastic + foil and freeze for up to 2 months. Thaw overnight in the fridge.
- Reheating? Cheesecake is served chilled. If you prefer softer texture, rest a slice at room temperature 10 minutes before serving.
FREQUENTLY ASKED QUESTIONS
Can I make this ahead?
Absolutely—cheesecake tastes best the next day.
Can I skip the food coloring?
Yes, but you’ll lose the signature red velvet look.
Can I double the recipe?
Not for a single pan—it will not bake evenly. Make two separate cheesecakes instead.
My cheesecake cracked—what did I do wrong?
Probably overmixing eggs or cooling too quickly. Luckily, cracks are easy to cover.
Can I use a different cookie crust?
Yes! Chocolate grahams or even Biscoff cookies are delicious alternatives.
RECIPE CARD
Christmas Red Velvet Cheesecake with Oreo Crust
Yield: 12 servings
Prep Time: 20 minutes
Cook Time: 60 minutes
Chill Time: 6 hours
Total Time: 7 hours 20 minutes
Ingredients
For the Crust:
- 24 Oreo cookies
- 5 tbsp unsalted butter, melted
For the Filling:
- 24 oz cream cheese, softened
- 1 cup granulated sugar
- 1 cup sour cream
- 3 large eggs
- 1 tbsp cocoa powder
- 1–2 tsp red gel food coloring
- 1 tsp vanilla extract
- 1 tsp white vinegar
- Pinch of salt
Method
- Preheat oven to 325°F (163°C). Line the bottom of a 9-inch springform pan.
- Pulse Oreos into crumbs. Mix with melted butter. Press into pan and bake 10 minutes.
- Beat cream cheese until smooth. Add sugar and mix again.
- Add sour cream, cocoa, vanilla, vinegar, and salt. Mix until glossy.
- Add eggs one at a time on low speed. Stir in food coloring.
- Pour filling over crust. Tap to release air bubbles.
- Bake 55–65 minutes until edges are set and center jiggles.
- Cool gradually in oven with door ajar. Chill at least 6 hours.
Notes
- For deeper red, increase gel color; avoid liquid dyes.
- Slice with a hot, clean knife for perfect edges.